Photographing Artwork for Your Digital Portfolio
The following tips are provided to help you get the best results when photographing your artwork in any setting.
Suggested Equipment
- Camera (Preferably a single lens reflex style, interchangeable lens digital camera. However a point-and-shoot version with a resolution of five megapixels or higher will suffice.)
- Tripod
- Bubble level
- Tape measure
- Photo gray card
- Large piece of gray or black paper (larger than the artwork) for use as background
Optional Equipment
- Tungsten lights
- Hand-held light meter
- Softboxes or other light diffusion materials
- Dark gray seamless paper – available through photo retailers
- Two-Dimensional Artwork (outdoor without lighting equipment)
-
- Begin by choosing a well-lit place to shoot with low glare. A preferable location is in the shade or during an overcast day to avoid shadows and glare.
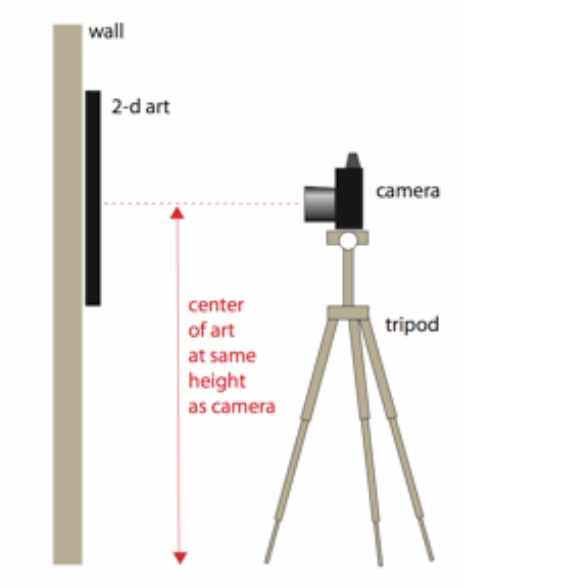
- Hang your black or gray paper with the center approximately at eye level.
- Start by hanging your artwork with the center of the piece approximately at eye level. Using your bubble level, make sure the artwork is level.
- Using your tape measure, measure the height to the center of the artwork.
- Set your camera on the tripod and use the height you measured to adjust the height of the camera. Measure to the center of your lens. Also be sure to level your camera using the bubble level to match your art.
- Your camera’s distance from the artwork should be determined by the angle of view of the lens. Fill as much of the image frame as possible without cropping out any of the artwork.
- Examine the edges and corners of the art through the viewfinder to be sure there is no distortion or key-stoning (when one side appears longer than a parallel side).
- Set your camera to the highest resolution setting and lowest film speed rating for the highest quality images possible.
- For proper exposure, use a hand-held light meter. If this is not available, use the
photo gray card to take an in-camera light meter reading. Set your camera’s aperture
and shutter based upon your light meter reading. If you are using a point-and-shoot
camera, use the automatic exposure settings determined by your camera.
Note: As long as the light does not change significantly, this exposure will provide good result for each piece photographed. There is no need to re-meter. Please note that once the gray card is taken away, the meter may indicate overexposure or underexposure, particularly if the piece is predominantly dark or light. Do not make any changes. Now you are ready to begin photographing your work.
- Two-Dimensional Artwork (indoor with lighting equipment)
-
- Start by hanging your artwork with the center of the piece approximately at eye level. Using your bubble level, make sure the artwork is level.
- Using your tape measure, measure the height to the center of the artwork.
- Set your camera on the tripod and use the height measured to adjust the height of the camera. Measure to the center of your lens and level your camera using the bubble level to match your artwork.
- Your camera’s distance from the artwork should be determined by the angle of view of the lens. Be sure to fill as much of the image frame as possible without cropping out any of the artwork.
- Examine the edges and corners of the art through the viewfinder to be sure there is no distortion or key-stoning (when one side appears longer than a parallel side).
- Set your camera to the highest resolution setting and lowest film speed rating for the highest quality images possible.
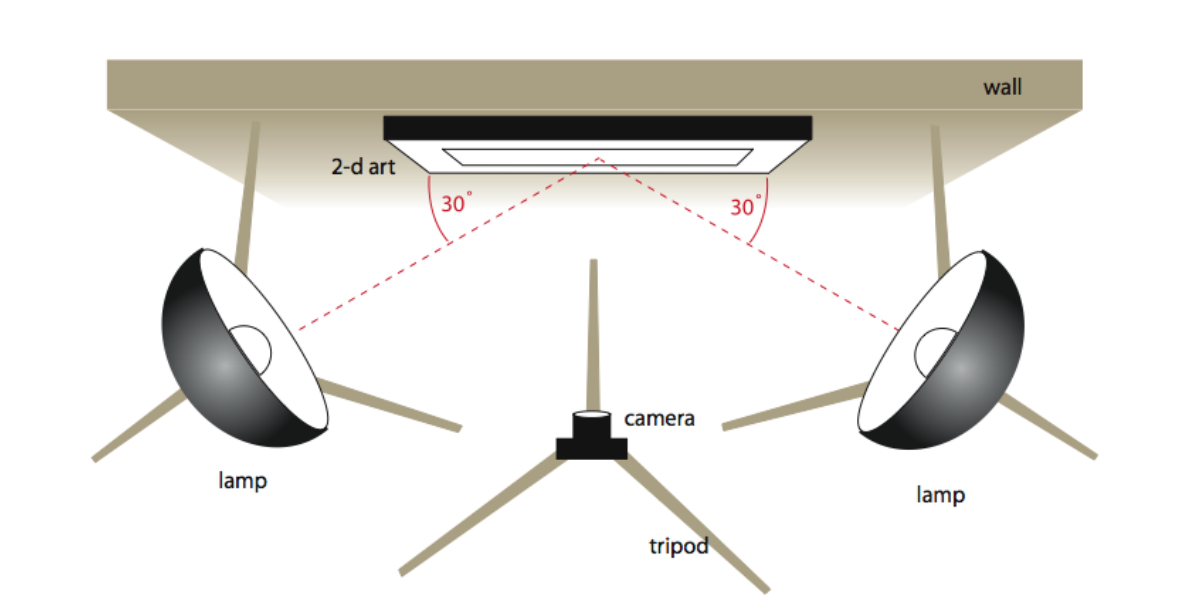
- Set up your lights. Place lights at an equal distance from your artwork at approximately 30º–45º angles and avoiding glare for best results. The height of your lights should be on center with your artwork.
- For proper exposure, use a hand-held light meter. If this is not available, use the
photo gray card to take an in-camera light meter reading. Set your camera’s aperture
and shutter based upon your light meter reading. If you are using a point-and-shoot
camera, use the automatic exposure settings determined by your camera.
Note: As long as the light does not change significantly, this exposure will provide good results for each piece photographed. There is no need to re-meter. Once the gray card is taken away, the meter may indicate overexposure or underexposure, particularly if the piece is predominantly dark or light. Do not make any changes and continue using the reading from the gray card. Now you are ready to begin photographing your work.
- Three-Dimensional Artwork (outdoor without lighting equipment)
-
- Begin by choosing a well-lit place to shoot with low glare. A preferable location is in the shade or during an overcast day.
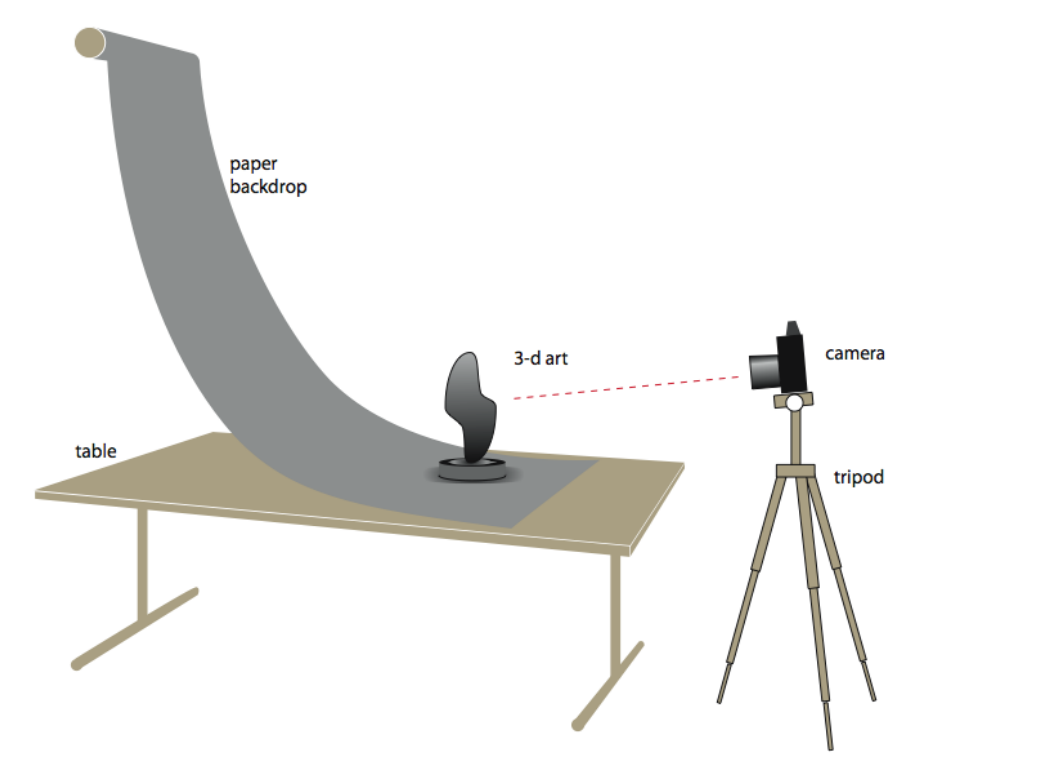
- Place a table up against a wall. Use pushpins or tape to attach fabric, paper or another background to the wall above the table, allowing it to sweep down covering the table. Make sure the fabric arcs gently between the wall and the table.
- If the artwork is producing a lot of glare, the light may be diffused by holding sheets of tracing paper or vellum in between the light and the artwork. This will soften the light and prevent unwanted highlights.
- Set your camera on its tripod. The height should be a low angle so that you are looking as directly into the piece as possible. Level your camera using the bubble level to match your artwork.
- Your camera’s distance to the artwork should be determined by the angle of view of the lens. Be sure to fill as much of the image frame as possible without cropping out any of the artwork.
- Set your camera to the highest resolution setting and lowest film speed rating for the highest quality images possible.
- For proper exposure, use a hand-held light meter. If this is not available, use the
photo gray card to take an in-camera light meter reading. Set your camera’s aperture
and shutter based upon your light meter reading. If you are using a point-and-shoot
camera, use the automatic exposure settings determined by your camera.
Note: As long as the light does not change significantly, this exposure will provide good results for each piece photographed. There is no need to re-meter. Please note that once the gray card is taken away, the meter may indicate overexposure or underexposure, particularly if the piece is predominantly dark or light. Do not make any changes. Continue using the reading from the gray card. Now you are ready to begin photographing your work.
- Three-Dimensional Artwork (indoor with lighting equipment)
-
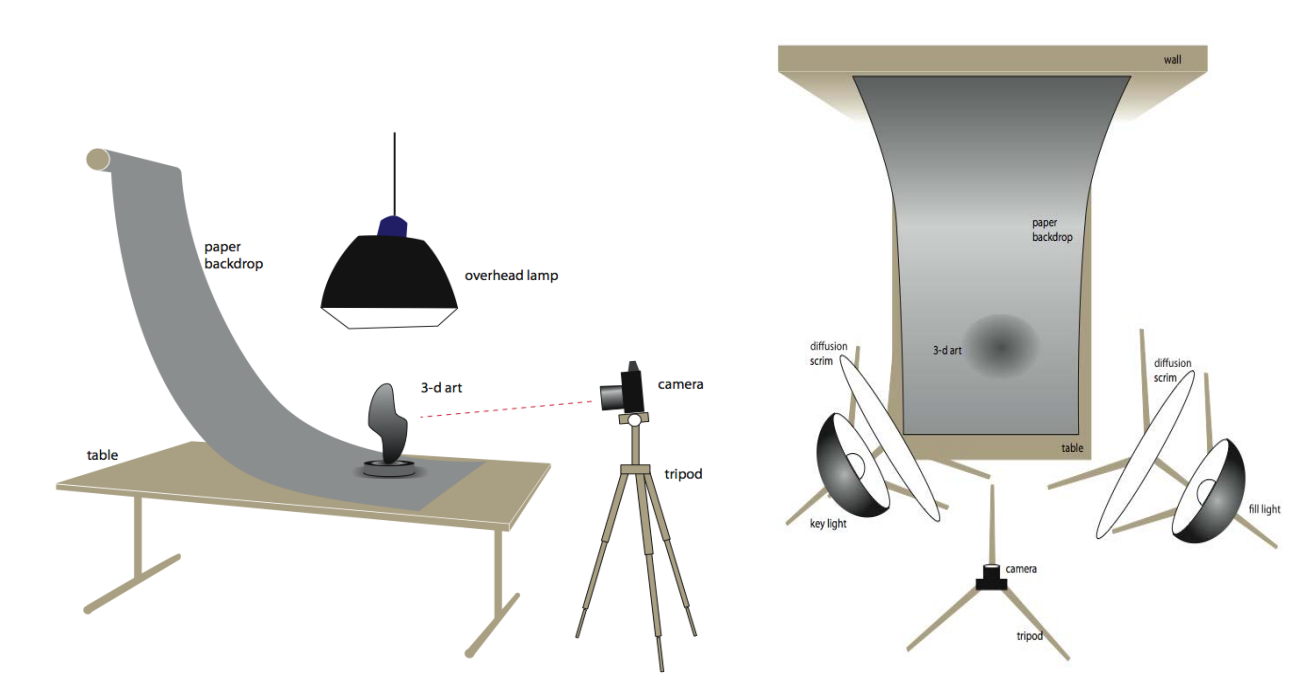
- Place a table up against a wall. Use pushpins or tape to attach fabric or other background to the wall above the table, allowing it to sweep down covering the table. Make sure the fabric arcs gently between the wall and the table.
- Place one light on the work as the main light preferably coming from an angle and from above. The second light should be further away from the artwork to help fill in the shadows created by the first light on the opposite side. Avoid creating distracting shadows on the background.
- If the artwork is producing a lot of glare, the light may be diffused by holding sheets of tracing paper or vellum in between the light and the artwork. This will soften the light and prevent unwanted highlights.
- Set your camera on the tripod. The height should be a low angle so that you are looking as directly into the piece as possible. Also be sure to level your camera using the bubble level to match your art.
- Your camera’s distance to the artwork should be determined by the angle of view of the lens. Fill as much of the image frame as possible without cropping out any of the artwork.
- Set your camera to the highest resolution setting and lowest film speed rating for the highest quality images possible.
- For proper exposure, use a hand-held light meter. If this is not available, use the
photo gray card to take an in-camera light meter reading. Set your camera’s aperture
and shutter based upon your light meter reading. If you are using a point-and-shoot
camera, use automatic exposure settings determined by your camera.
Note: As long as the light does not change significantly, this exposure will provide good results for each piece photographed. There is no need to re-meter. Once the gray card is taken away, the meter may indicate overexposure or underexposure, particularly if the piece is predominantly dark or light. Do not make any changes and continue using the reading from the gray card. Now you are ready to begin photographing your work.
- Preparing your digital images for submission
-
Image size and resolution
Check the specifics required for the portfolio you are submitting. Be sure not to submit an incorrect size, resolution or file format. Some general rules of thumb for resolution are as follows:
- Professional printing: 300 dpi
- PowerPoint, PDF or web presentations: 72 dpi
File format
While there are many formats the most common are JPEG and TIF. Use these to be safe as they are accepted and opened by the majority of computers and applications. JPEG is the most common as it requires the least amount of disk space and can be shared the most easily.
There are a few universal image editing functions that will be applicable to you:
- Crop: Use this tool to cut away excess image or background that is unnecessary to describing your artwork.
- Resize: This allows you to set image size and resolution (again, check the specifics outlined).
- Brightness and contrast: Use with caution as these tools can ruin an otherwise acceptable image. Your monitor may not be very accurate; if you have the ability to check numeric values of RGB (red, green and blue) be sure that your image highlights don’t exceed 245 and that your shadows don’t go below 15 for each of the colors.
Saving and naming your images
As an artist, you may submit some of the same digital images of your work to different organizations for exhibitions, competitions, publishing and/or portfolio reviews. Organize your images by categorizing them in folders by date of completion, medium or whatever works best for you. Follow a consistent naming convention for your image files. Some suggestions are listed below:
- Keep an uncompressed version (TIF format) of your files on your hard drive or archived on external media.
- If you want your work to be quickly and easily shared with your identification, save your files as such: "LastNameFirstInitial_CompletionYearAbbreviatedTitle_AbbreviatedMedium.jpg"(Example: JacksonM_2009Woman_ch.jpg)
- Keep the number of characters in a file name to 30 or less.
- Avoid using spaces as they can cause problems in databases and on the webs.
- Capitalizing the first letter of each word allows for easier reading.
- Underscores and dashes are the only permitted special characters.
- When submitting artwork on a disk or through email, include an image description sheet with corresponding numbers to your images.
- Save your files in a folder that is clearly labeled and easy to find on your disk. Double check once you burn your disk to ensure all the images are there. You don’t want to be overlooked for a simple error.
- Other Tips
-
Color balance
Be sure that your light source and your camera’s white balance setting are the same. With daylight or strobe (flash) lighting, use the daylight color balance setting. Tungsten/ incandescent light (clamp-on lights or incandescent bulbs) require a tungsten/ incandescent setting.
Avoiding glare
- Move lights to alternate positions, changing the angle of reflection.
- If shooting artwork with a lot of reflective surface, use black or white paper or mat board to help eliminate the reflection.
- If lights are causing glare, increase the angle of the lights or move further to the sides of the artwork until the reflection is no longer visible.
- If available, the use of an overhead diffused light source (like a softbox) will greatly aid in photographing 3-D works and help create a gradated background for your work.
- The use of white foam board or mat board can greatly help in evening lighting with 3-D works. Use these to help reflect the light onto your objects. This can replace the use of your fill light.
These tips are courtesy of the University of Toledo.
De Pree Art Center275 Columbia AvenueRoom 138Holland, MI 49423
workP. 616.395.7500
art@hope.edu