Connecting to torque3
You can connect to torque3, the departmental file server, from campus using either a PC or a Mac. Here's how.
- On a PC (outside the library)
-
- Right-click on the desktop icon labeled This PC
- Choose Map network drive
- Choose H: for the drive (any letter is OK; H: is a convention because it stands for home directory)
- Enter \\torque3\username for the folder, replacing username with your 1Hope user name (e.g. \\torque3\stu.dent if your 1Hope email address is stu.dent@hope.edu). Note the \ is the backslash character, typically located above the Enter key.
- When prompted, enter your 1Hope user name for the username, and your torque3 password for the password.
- Click the Finish button
When you're done using the computer, you should remember to log off the computer in order to ensure that any mapped network drives are disconnected.
What if I'm not prompted for a user name and password, or get an "Access Denied" message?
This usually occurs when a previous student has used the computer and neglected to disconnect any mapped networked drives before leaving.
The easiest way to solve this problem is to log off from the computer and then log back in. Logging off automatically disconnects any drives that have been mapped.
- On a library PC
-
The only difference in the library compared to other PCs on campus will be that you'll need to tell Windows to connect using a password other than the one you use to log on to the computer (which was your 1Hope address and password).
The screen shot below shows you what you need to do when asked for your user name and password.
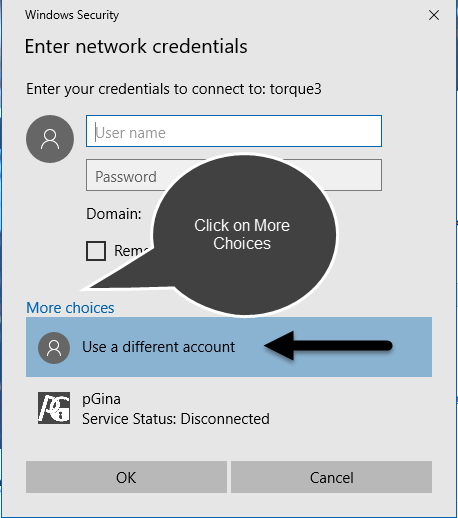
Once you've clicked these things, enter your 1Hope user name and torque3 password to finish connecting.
- On a Mac
-
Follow these steps to connect to your torque3 space on a Mac:
- Open the Finder application
- Choose Go, Connect to Server from the menu
- Enter smb://torque3.engin.hope.edu/username into the box labeled Server Address, replacing username with your 1Hope user name (e.g. \\torque3\stu.dent if your 1Hope email address is
stu.dent@hope.edu)
To map the course drive area, enter smb://torque3.engin.hope.edu/course instead. - Click the Connect button
You should be prompted for a user name and a password to connect; use your 1Hope user name and torque3 password to connect.
To access your files, select your computer from the drop-down at the top of any file dialog or finder window, as shown in the screen shot below.

Accessing files from off campus
Most Internet Service Providers do not allow accessing remote file servers using the methods that work on campus. The best way to get access to your files from off campus is to use the File Transfer Protocol (FTP) to copy files from our servers to your computer, or from your computer to our servers.
FTP has been around since the beginning of the Internet. Most students find it easiest to use a graphical FTP client rather than using the FTP commands directly. Here are some recommended options:
- Filezilla: made by the makers of the Firefox web browser, one of the advantages of Filezilla
is that it has both PC and Mac versions that function similarly.
When connecting to torque3 using Filezilla, be sure to specify port 22 as the port to connect to. - WinSCP: this a good "donation-ware" product that runs only on Windows; its interface is
slightly better than Filezilla's.
WinSCP will use the sftp protocol and port 22 by default; make sure you don't change these.
Any FTP client will require you to enter a host name that you want to connect to. You can use rizzo.hope.edu as the host. Use the same credentials you use to map network drives to authenticate yourself.
There are two additional ways WinSCP will let you transparently modify files on a remote server: by editing an individual file, or by synchronizing the contents of a local folder with a folder on the remote server.
- Editing a single file
- From within a listing of a remote folder's contents, you can right click on a file and choose the Edit menu option. This will cause WinSCP to download the file to a temporary folder on your computer, and watch for changes to that file. Each time you save the temporary file, WinSCP will automatically copy the file back to the remote server. In this way, it's like you're editing the file directly.
- Synchronizing folders
-
In this scenario, you would start by copying a remote folder somewhere onto your computer. You can then edit the files on your computer as much as you would like.
At any time, you can synchronize the local and remote folders from within WinSCP by choosing Commands, Synchronize from WinSCP's menu (this assumes you have the correct local and remote folders open within WinSCP before initiating the synchronization operation).
VanderWerf Hall27 Graves PlaceRoom 204Holland, MI 49423
workP. 616.395.7510
cschair@hope.edu